
Uncategorized
How to increase power and improve performance on {nome[1]} jetsky with the Racext Chip box
Mar
How to increase power and improve performance on {nome[1]} jetsky with the Racext Chip box – On our website, you can find the best electronic products at advantageous prices.
✅ Choose free delivery to save even more
How to increase power and improve performance on {nome[1]} jetsky with the Racext Chip box
Before purchasing our products, we recommend that you read the product description. If you have any doubts, do not hesitate to contact us. We will be happy to help you choose the most suitable product for your needs.
Contact us on Whatsapp: HERE
QUALITY GUARANTEE choose safety, savings, and professionalism, choose us. We offer top-notch assistance that will never leave you alone during the entire pre- and post-purchase phase. We offer high-quality products, smart and safe savings, do not rely on improvised sellers.
Introduction:
Welcome to the {nome[1]} Jet Ski Power Enhancement Manual using the Racext Add-On Module for IAT Sensor. If you own a {nome[1]} Jet Ski and are looking to increase its power and performance, then this manual is the perfect guide for you.
Our Racext Add-On Module for IAT Sensor is designed to optimize the performance of your {nome[1]} Jet Ski by providing real-time data to the engine control unit (ECU), resulting in a significant increase in horsepower, acceleration, and torque. This manual will guide you through the installation process and help you set up the Racext Add-On Module for your jet ski.
In this manual, we will cover everything from the benefits of power enhancement to the installation process and testing of the Racext Add-On Module. We will also provide maintenance and care tips to help you get the most out of your power-enhanced {nome[1]}
Whether you’re a professional racer or a weekend enthusiast, this manual is an essential resource for anyone looking to maximize the performance of their {nome[1]}. So, let’s get started and take your jet ski to the next level with the Racext Add-On Module for IAT Sensor.
How to increase power and improve performance on {nome[1]} jetsky with the Racext Chip box
a. Overview of Jet Ski:
Jet skis, also known as personal watercraft, have become increasingly popular in recent years due to their versatility and ease of use. They are compact, lightweight, and maneuverable, making them perfect for recreational use, such as cruising, racing, and towing water skiers or wakeboarders.
Jet skis are powered by an internal combustion engine that drives a water jet propulsion system, which provides propulsion and steering. The engine is controlled by an engine control unit (ECU), which regulates fuel injection, ignition timing, and other performance parameters.
While jet skis are already fun and exciting to ride, many riders seek ways to enhance their power and performance. This is where the Racext Add-On Module for IAT Sensor comes in. By optimizing the engine’s performance through real-time data and feedback, the Racext Add-On Module can significantly increase the jet ski’s horsepower, acceleration, and torque, providing a more exhilarating riding experience.
How to increase power and improve performance on {nome[1]} jetsky with the Racext Chip box
b. Benefits of Power Enhancement:
There are many benefits to enhancing the power and performance of your jet ski with the Racext Add-On Module for IAT Sensor. Some of these benefits include:
- Increased horsepower and acceleration: With the Racext Add-On Module, you can significantly increase your jet ski’s horsepower and acceleration, allowing you to reach higher speeds and accelerate more quickly.
- Improved fuel efficiency: By optimizing the engine’s performance, the Racext Add-On Module can also improve fuel efficiency, which can save you money on gas and extend the time you can spend on the water.
- Enhanced towing capacity: With increased horsepower and torque, your jet ski can also tow water skiers, wakeboarders, or other water sports enthusiasts more easily.
- Better overall performance: By providing real-time data and feedback to the ECU, the Racext Add-On Module can improve the overall performance of your jet ski, making it more responsive and smoother to ride.
Overall, the Racext Add-On Module for IAT Sensor can take your jet ski to the next level, providing a more exhilarating and enjoyable riding experience.
![How to increase power and improve performance on {nome[1]} jetsky with the Racext Chip box](https://boatxt.com/wp-content/uploads/2023/03/jet-sky-800x800-1-400x400.webp)
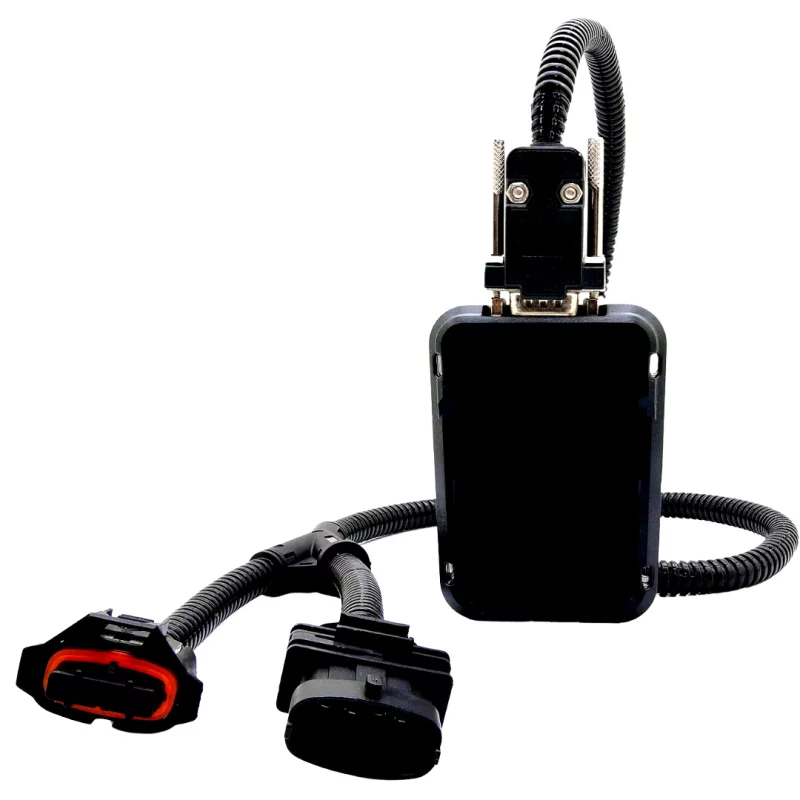
c. Racext Add-On Module for IAT Sensor:
The Racext Add-On Module for IAT Sensor is a state-of-the-art device that is designed to optimize the performance of your jet ski’s engine. This module is specifically designed to work with the IAT (intake air temperature) sensor, which is an important component of the engine control system.
The Racext Add-On Module uses advanced algorithms to provide real-time data and feedback to the ECU, allowing it to make more precise and efficient adjustments to the engine’s performance. This results in significant increases in horsepower, acceleration, and torque, making your jet ski faster and more powerful.
The installation process for the Racext Add-On Module is straightforward and easy to follow. Once installed, the module is automatically calibrated to the specific needs of your jet ski’s engine, ensuring that it operates at peak performance.
In addition to improving performance, the Racext Add-On Module is also designed to be durable and reliable, ensuring that it can withstand the harsh marine environment and provide long-lasting performance.
Overall, the Racext Add-On Module for IAT Sensor is an essential component for anyone looking to enhance the performance of their jet ski, and we are confident that you will be satisfied with the results.
How to increase power and improve performance on {nome[1]} jetsky with the Racext Chip box
Installation of Racext Add-On Module
Before beginning the installation process, we recommend that you review the installation manual and become familiar with the Racext Add-On Module and its components. This will help you to understand the process better and ensure that you have all the necessary tools and equipment.
We also recommend that you perform a thorough inspection of your jet ski’s engine and electrical system to ensure that they are in good working condition. Any issues or malfunctions should be addressed before proceeding with the installation.
Once you have completed the necessary preparations, you can begin the installation process, which involves connecting the Racext Add-On Module to the IAT sensor on your jet ski’s engine. Our installation guide will provide detailed instructions on how to do this, including illustrations and photographs to help you along the way.
By the end of this chapter, you will have successfully installed the Racext Add-On Module on your {nome[1]} jet ski, and you will be ready to experience the improved performance and power that it provides.
a. Required tools and equipment:
Before beginning the installation process, it is important to ensure that you have all the necessary tools and equipment. The tools and equipment required for the installation of the Racext Add-On Module for IAT Sensor are as follows:
- Socket set: A socket set is required to remove the bolts and nuts that hold the airbox and intake duct in place.
- Pliers: Pliers will be required to remove the clamps that hold the airbox and intake duct in place.
- Screwdriver: A screwdriver is required to remove the screws that hold the airbox and intake duct in place.
- Wire strippers/crimpers: Wire strippers/crimpers will be required to connect the wires from the Racext Add-On Module to the IAT sensor.
- Electrical tape: Electrical tape will be required to secure the wires after they have been connected.
- Heat shrink tubing: Heat shrink tubing is recommended to provide a more secure and long-lasting connection between the wires.
- Multi-meter: A multi-meter is recommended to test the electrical connections and ensure that they are functioning properly.
- Owner’s manual: The owner’s manual for your {nome[1]} jet ski will be helpful to locate the IAT sensor and other components that are necessary to install the Racext Add-On Module.
By having all the necessary tools and equipment, you can ensure that the installation process is completed efficiently and effectively.
![How to increase power and improve performance on {nome[1]} jetsky with the Racext Chip box - box](https://boatxt.com/wp-content/uploads/2023/03/Kit-Performance-Tuning-pro-800x800-1.webp)
b. Installation steps with diagrams:
The following steps outline the installation process for the Racext Add-On Module for IAT Sensor on the {nome[1]} jet ski. Refer to the accompanying diagrams and photographs for further assistance.
Step 1: Remove the airbox and intake duct.
Using a socket set, pliers, and screwdriver, remove the bolts, nuts, and clamps that hold the airbox and intake duct in place. Once removed, set the airbox and intake duct aside.
Step 2: Locate the IAT sensor.
Refer to your owner’s manual to locate the IAT sensor on your {nome[1]} jet ski’s engine. The IAT sensor is usually located on the air intake tube or the intake manifold.
Step 3: Install the Racext Add-On Module.
Connect the wires from the Racext Add-On Module to the IAT sensor as shown in the wiring diagram provided. Use wire strippers/crimpers to ensure a secure connection. Once connected, wrap the wires with electrical tape or heat shrink tubing for added security.
Step 4: Reinstall the airbox and intake duct.
Place the airbox and intake duct back in their original positions and use the bolts, nuts, and clamps to secure them in place.
Step 5: Test the installation.
Once the Racext Add-On Module has been installed, start the engine and check to ensure that everything is functioning properly. Use a multi-meter to test the electrical connections and ensure that they are functioning correctly.
By following these steps and using the diagrams provided, you can successfully install the Racext Add-On Module for IAT Sensor on your {nome[1]} jet ski and experience the improved performance and power that it provides.
![How to increase power and improve performance on {nome[1]} jetsky with the Racext Chip box - book](https://boatxt.com/wp-content/uploads/2023/03/Kit-Performance-Tuning-pro-2-800x800-1.webp)
c. Precautions and Safety Measures:
When installing the Racext Add-On Module for IAT Sensor on your {nome[1]} jet ski, it is important to take certain precautions to ensure your safety and the safety of those around you. Follow these guidelines to minimize the risk of injury or damage to your jet ski:
- Disconnect the battery: Before beginning the installation process, always disconnect the battery to avoid any electrical shocks or short-circuits.
- Use proper tools: Make sure you have the proper tools and equipment needed for the installation process. Using the wrong tools or equipment can lead to damage or injury.
- Follow instructions: Read and follow the instructions provided in the manual carefully. Failure to follow the instructions can result in damage to your jet ski or injury.
- Avoid contact with hot surfaces: During the installation process, be mindful of any hot surfaces or moving parts on the engine. Contact with these surfaces can cause burns or other injuries.
- Test the installation: Once the installation is complete, test the system to ensure it is functioning properly before taking your jet ski out on the water.
By taking these precautions and following the safety measures outlined in this manual, you can safely and effectively install the Racext Add-On Module for IAT Sensor on your {nome[1]} jet ski and enjoy the increased power and performance that it provides.
How to increase power and improve performance on {nome[1]} jetsky with the Racext Chip box
Setting up the Racext Add-On Module
Now that you have successfully installed the Racext Add-On Module for IAT Sensor on your {nome[1]} jet ski, it is time to set up the module to optimize your jet ski’s power and performance. The setup process is simple and can be done quickly by following the instructions in this manual. This chapter will guide you through the steps required to set up the Racext Add-On Module and calibrate it to your jet ski’s specifications. By completing the setup process, you can ensure that your jet ski is running at its maximum potential and that you are getting the most out of your Racext Add-On Module. So, let’s get started!
Paragraph A: Calibration of the module
Calibration is a crucial step in setting up the Racext Add-On Module for optimal performance. Calibration involves setting the parameters of the module to match the specifications of your jet ski. It is recommended to perform calibration after the installation process is complete, and the module is properly connected to the IAT sensor.
To calibrate the module, you will need to connect your jet ski to a diagnostic tool and access the engine control unit (ECU). Once you have access to the ECU, you will need to adjust the module’s settings, including the air/fuel ratio, ignition timing, and other engine parameters. The process may vary depending on your jet ski’s make and model, so it is essential to refer to the manufacturer’s manual or seek professional assistance if you are not familiar with the calibration process.
It is important to note that incorrect calibration may result in suboptimal performance or even damage to your jet ski’s engine. Therefore, it is crucial to follow the calibration instructions carefully and make adjustments cautiously. After calibration, you should test your jet ski to ensure that it is running smoothly and efficiently. By completing this step, you can ensure that your Racext Add-On Module is set up correctly and that your jet ski is performing at its best.
Paragraph B: Configuring the module for the {nome[1]} Jet Ski
To configure the Racext Add-On Module specifically for the {nome[1]}Jet Ski, you will need to follow a set of specific instructions. The module comes with a user manual that includes detailed instructions for configuring the module for your specific jet ski model.
Firstly, you will need to locate the IAT sensor on your jet ski, which is usually located near the air intake. Once you have found the IAT sensor, you can connect the Racext Add-On Module to it, following the instructions provided in the manual. You may need to remove some parts of the jet ski to access the IAT sensor, so be sure to follow the instructions carefully.
After the module is connected to the IAT sensor, you will need to configure the module to match the specifications of the {nome[1]} Jet Ski. This process may involve adjusting the air/fuel ratio, ignition timing, and other engine parameters to optimize performance. The user manual should provide detailed instructions for configuring the module for the {nome[1]} Jet Ski.
It is essential to ensure that you follow the instructions carefully to prevent damage to your jet ski’s engine or the Racext Add-On Module. Once the module is correctly configured, you can perform a test run to ensure that your jet ski is running smoothly and efficiently. By following these steps, you can enjoy improved power and performance from your {nome[1]} Jet Ski with the Racext Add-On Module.
c. Troubleshooting common issues
While the installation and setup of the Racext Add-On Module are relatively straightforward, there are some common issues that users may encounter. One of the most common issues is incorrect wiring, which can cause the module to malfunction or not work at all. To troubleshoot this issue, users should double-check the wiring diagram and ensure that all connections are secure and in the correct place. Another issue that users may face is incorrect calibration, which can lead to poor performance or even damage to the engine. In this case, users should recalibrate the module according to the instructions provided in the manual. If these steps do not resolve the issue, users should contact customer support for further assistance.
How to increase power and improve performance on {nome[1]} jetsky with the Racext Chip box
Testing and Performance Enhancement
Welcome to the chapter on Testing and Performance Enhancement. Now that you have successfully installed and configured the Racext Add-On Module on your {nome[1]} Jet Ski, it’s time to put it to the test. In this chapter, we will guide you through the process of testing the module and measuring the performance enhancement achieved. We will also provide you with tips and tricks to further optimize the performance of your jet ski using the Racext module. Let’s dive in and explore the full potential of your {nome[1]} Jet Ski with Racext.
![How to increase power and improve performance on {nome[1]} jetsky with the Racext Chip boxTesting and Performance Enhancement](https://boatxt.com/wp-content/uploads/2023/03/Yellow-Attractive-Shocking-Fact-YouTube-Thumbnail-711x400.png)
Testing and Performance Enhancement
a. Conducting
Before taking the Jet Ski out on the water, it is important to conduct a test run to ensure that the Racext Add-On Module has been installed and configured correctly. This will help identify any issues that need to be addressed before taking the Jet Ski out for a full ride. During the test run, it is recommended to start with a lower throttle and gradually increase it to observe how the Jet Ski responds. It is also important to monitor the engine temperature and ensure that it stays within the recommended range. A successful test run will give you confidence that the Racext Add-On Module is functioning properly and that the Jet Ski is ready for enhanced performance.
b. Monitoring performance metrics
c. Comparing before and after results
After conducting a test run and monitoring the performance metrics, it is important to compare the results before and after the installation of the Racext add-on module. This will help in determining the effectiveness of the module and whether the power enhancement was successful or not. The comparison should include factors such as acceleration, speed, and fuel consumption. By comparing the before and after results, the user can see the improvement in the performance of the {nome[1]} jet ski and make any necessary adjustments. This will ensure that the jet ski is operating at its highest potential and delivering the best performance possible.
How to increase power and improve performance on {nome[1]} jetsky with the Racext Chip box
Maintenance and Care
In this chapter, we will discuss the important aspects of maintaining and caring for your {nome[1]} Jet Ski after installing the Racext Add-On Module. Regular maintenance is essential to keep your Jet Ski in good condition and ensure the Racext Add-On Module continues to function optimally. Neglecting maintenance can lead to problems with the performance of your Jet Ski and the Racext Add-On Module. This chapter will provide you with guidelines and tips on how to properly care for your Jet Ski and the Racext Add-On Module to extend their lifespan and maintain their performance.
a. Maintenance schedule
Here’s the paragraph:
Regular maintenance is key to ensuring the optimal performance of your {nome[1]} Jet Ski with the Racext Add-On Module. We recommend following a maintenance schedule to keep your Jet Ski and module in top condition. The maintenance schedule should include regular checks on the Racext module and its connections, as well as routine cleaning of the Jet Ski and its components. Depending on your usage, you may also need to perform more extensive maintenance, such as replacing filters or spark plugs. Be sure to consult your owner’s manual and follow the manufacturer’s recommended maintenance schedule to keep your Jet Ski running smoothly.
b. Care tips for the Racext Add-On Module
Proper care of the Racext Add-On Module can help ensure its optimal performance and longevity. Here are some care tips to keep in mind:
- Keep it clean: Regularly clean the module to prevent dust and debris from accumulating on it. Use a soft cloth or brush to gently remove any dirt.
- Avoid water exposure: The module is not waterproof, so make sure to keep it dry and avoid water exposure. If the module gets wet, disconnect it from the sensor IAT and dry it thoroughly before reconnecting.
- Check the wiring: Make sure the module’s wiring is secure and not damaged. Any loose or damaged wires should be repaired or replaced immediately to prevent any issues with the module’s functionality.
- Store in a safe place: When not in use, store the module in a safe and dry place. Avoid storing it in areas that are exposed to extreme temperatures or moisture.
By following these care tips, you can help ensure that the Racext Add-On Module remains in good condition and performs optimally for a long time.
c. Troubleshooting and repairs
In the event of any issues with the Racext Add-On Module, there are some troubleshooting steps that can be taken. First, check all connections to ensure they are secure and properly attached. If the module is not functioning correctly, try resetting it by disconnecting and reconnecting the power source. If these steps do not resolve the issue, refer to the troubleshooting section in the user manual or contact our customer support team for further assistance. In the case of necessary repairs, it is recommended to seek the services of a qualified technician to ensure proper handling of the module and prevent any damage to the jet ski. Regular maintenance and care can help prevent many issues from occurring, and it is important to follow all guidelines and recommendations provided in the manual to ensure optimal performance and longevity of the Racext Add-On Module.
Conclusion
In this manual, we have provided a detailed guide on how to increase the power of your {nome[1]} jet ski with the use of our Racext add-on module, which is installed on the IAT sensor. We have covered the installation process, calibration, configuration, testing, and maintenance of the module. Our aim was to provide you with a comprehensive understanding of how the Racext add-on module works and how you can get the best performance out of your jet ski. As we conclude this manual, we hope that you have found this guide helpful and informative. We encourage you to follow the instructions carefully and enjoy the enhanced power and performance of your {nome[1]} jet ski with the Racext add-on module.
a. Final thoughts on the {nome[1]} Jet Ski Power Enhancement
The {nome[1]} Jet Ski is a powerful watercraft designed to provide an exhilarating ride on the water. However, for those seeking even more power, the Racext Add-On Module can enhance the engine’s performance by increasing the air intake temperature. In this manual, we have discussed in detail how to install, calibrate, configure, test, and maintain the Racext Add-On Module on the {nome[1]} Jet Ski. We hope that this manual has provided you with the knowledge and confidence to boost your Jet Ski’s performance and enjoy an even more thrilling ride on the water.
b. Future enhancements and upgrades
As technology evolves and new innovations emerge, there will always be opportunities to improve and upgrade the performance of the {nome[1]} Jet Ski. Our Racext Add-On Module is just the first step in unlocking the full potential of this amazing watercraft. In the future, we plan to develop additional upgrades and enhancements that will further enhance the power, speed, and handling of the {nome[1]}. We are committed to staying at the forefront of jet ski technology and to providing our customers with the best possible products and services.
c. Contact information for support and assistance
If you have any questions or concerns about the Racext Add-On Module or its installation and maintenance, please don’t hesitate to contact our customer support team. You can reach us by email at info@racext.com. We’re dedicated to providing our customers with the highest level of service and support, and we’re always happy to assist with any issues or inquiries you may have.
Disclaimer
Shipping and Delivery Information
We understand the excitement and anticipation that comes with every purchase. That’s why we’ve established a clear and detailed shipping and delivery process to ensure that you are fully informed every step of the way, from the moment you finalize your order to when it arrives at your doorstep. This information is designed to meet and exceed merchant rules, offering you peace of mind and clarity on what to expect regarding the shipping and receiving of your goods.
Order Processing:
- Initial Confirmation: Once your order is placed, you will receive an immediate email confirmation. This email serves as an acknowledgment of your order and provides you with a unique order number for future reference.
- Packing Period: Our dedicated warehouse team takes great care in preparing your order. Please allow us 2 working days to carefully package your items. This time frame ensures that your products are securely packed, properly labeled, and prepared for shipment, minimizing the risk of damage during transit. Each product is inspected to ensure it meets our high-quality standards before being packaged.
Shipping:
- Carrier Handoff: After the packing period, your parcel is handed over to our trusted shipping carrier. This transition marks the beginning of the shipping phase.
- Shipping Time Frame: Our standard shipping timeframe is 5 to 7 working days. This period begins once the carrier has received your package from our warehouse. The delivery times are estimates based on the carrier’s guidelines and the destination of the package. It’s important to note that these are working days, excluding weekends and public holidays.
- Tracking and Updates: Upon dispatch, you will receive a tracking number via email. This number allows you to monitor the journey of your package in real-time. We also partner with our carriers to provide regular updates via email or SMS, ensuring you are informed of any progress or changes in the delivery schedule.
Delivery:
- Final Mile: The final leg of your package’s journey is known as the “final mile.” During this stage, local postal services or last-mile delivery partners take over to ensure your package reaches its final destination safely and efficiently.
- Receiving Your Package: Upon arrival, you might be required to sign for the delivery, depending on the carrier’s policy and the nature of the goods. If you are not available to receive the package in person, the carrier will leave a notice with further instructions on how to arrange for a redelivery or pickup from a local post office or depot.
- Customer Support: Should you have any questions or concerns about your delivery, our customer support team is here to assist. From tracking assistance to addressing delivery queries, we’re committed to ensuring your shopping experience is seamless and satisfactory.
We pride ourselves on transparency and communication throughout the shipping and delivery process. Our goal is to provide you with a smooth, hassle-free experience, keeping you informed and satisfied from the moment you shop with us to the excitement of unboxing your purchase.
LEGAL DISCLAIMER: PRODUCTS INTENDED EXCLUSIVELY FOR SPORTING AND COMPETITIVE USE
Important: Before proceeding with the purchase or use of our sport exhausts, please read the following notice carefully.
The products sold through this website are intended exclusively for sporting and competitive use. This means they have been designed and manufactured to be used in controlled environments, such as closed circuits or areas designated for sporting competitions, where emission and noise regulations may differ from those applied on public roads.
Public Road Use Not Allowed: It is emphasized that the installation and use of these devices on vehicles intended for circulation on public roads may not be permitted under the laws of your reference country regarding emission and noise regulation, as they are not designed for road use but for sporting use.
Buyer’s Responsibility: It is the buyer’s responsibility to ensure that the use of the purchased products complies with all applicable laws and regulations. The buyer assumes all legal liabilities for any non-compliant use of the products, including the installation and operation of such devices on unauthorized vehicles or in ways that violate applicable laws.
By continuing with the purchase, the buyer acknowledges and agrees that the use of the products is limited to sporting and competitive contexts as defined above and assumes full responsibility for any legal consequences arising from improper use of the products.
How to increase power and improve performance on {nome[1]} jetsky with the Racext Chip box
Compatibility:
It is the responsibility of the customer to ensure that the product is compatible with their vehicle. We recommend consulting with a professional mechanic before purchasing to confirm compatibility. BOATxt is not responsible for any issues that may arise from the use of our products, including but not limited to damage to the vehicle or personal injury.
Warranty:
All of our products come with a 2-year warranty in accordance with international standards. If you experience any issues with your product within the warranty period, please contact us for assistance. The warranty does not cover damages caused by improper installation, misuse, or external factors such as accidents or natural disasters.
Return Policy
We are committed to ensuring our customers’ complete satisfaction. If you are not completely satisfied with your purchase made on our website, you have the right to return the goods or all products purchased directly from our site within 14 days of receiving them. To be eligible for a return, items must be returned in their original packaging, with labels and protective seals intact, and in the same condition as when they were received. Products purchased directly from our website must be returned to our warehouse to obtain a full refund; please note that shipping costs for returning the goods may be the responsibility of the user. BOATxt is not responsible for any items lost during the return shipping.
Return Procedure:
- Send a request via email to info@boatxt.com within the return period.
- In the email, specify “Return” as the subject and provide a reason for the return.
- You will receive a response with instructions on how to proceed with the return.
- Follow the instructions to create your return label.
- Ship the order via courier to : .
- ⚫️Address: Creative Tower – Hamad Bin Abdulla Road – Office 4201 – Fujairah – U.A.E. –
- ⚫️WHATSAPP➡️ + 447365731386 ⚫️E-MAIL ➡️ info@Boatxt.com
payment refund times
Once we receive the returned goods, we will take 2 working days to issue a refund on the card used for the purchase. The customer will receive a 100% refund of the amount spent, excluding shipping costs for returning the goods.
We thank you for your patience and understanding.
Terms and Conditions
This website provides only the product with well-indicated codes and specifications. Please rely on an experienced workshop for the installation and choice of the product. We do not assume any responsibility for errors in choice, installation, or programming of the devices.
*The price is intended for a single product
*Days are always working days
All guides on this website are for illustrative purposes only. For many products, the use of special tools may be necessary. We always recommend seeking the advice of a specialized repair center for the selection and installation or programming of products purchased anywhere. We do not assume any responsibility for damage to property or persons, or user errors in the application of a guide on this website or for any other occurrence.
Product is not original but fully interchangeable with it
All rights reserved. All trade names and logos are registered trademarks of the respective manufacturers indicated
The trademarks mentioned on this site are the exclusive property of the automotive companies and are used here exclusively to facilitate the search for vehicles by our customers. We do not assume any responsibility for damages to property or persons, or user errors in the application of a guide on this website or for any other occurrence.
Secure Payments
When making purchases on our website, you can be confident that your transaction is secure. All financial transactions are processed on the secure and certified servers of PayPal or Stripe. These platforms allow us to accept payments from all VISA, VISA ELECTRON, MAESTRO, POSTEPAY, AMERICAN EXPRESS, AURA, and DISCOVER credit cards.
Quality Guarantee
Choose safety, savings, and professionalism by choosing us. We offer top-level customer support that will never leave you alone during the pre- and post-purchase phases. We offer top-quality products and intelligent, secure savings. Don’t trust inexperienced sellers.
NOTE: In the event that the product is not available in stock, we reserve the right to issue a full and immediate refund.